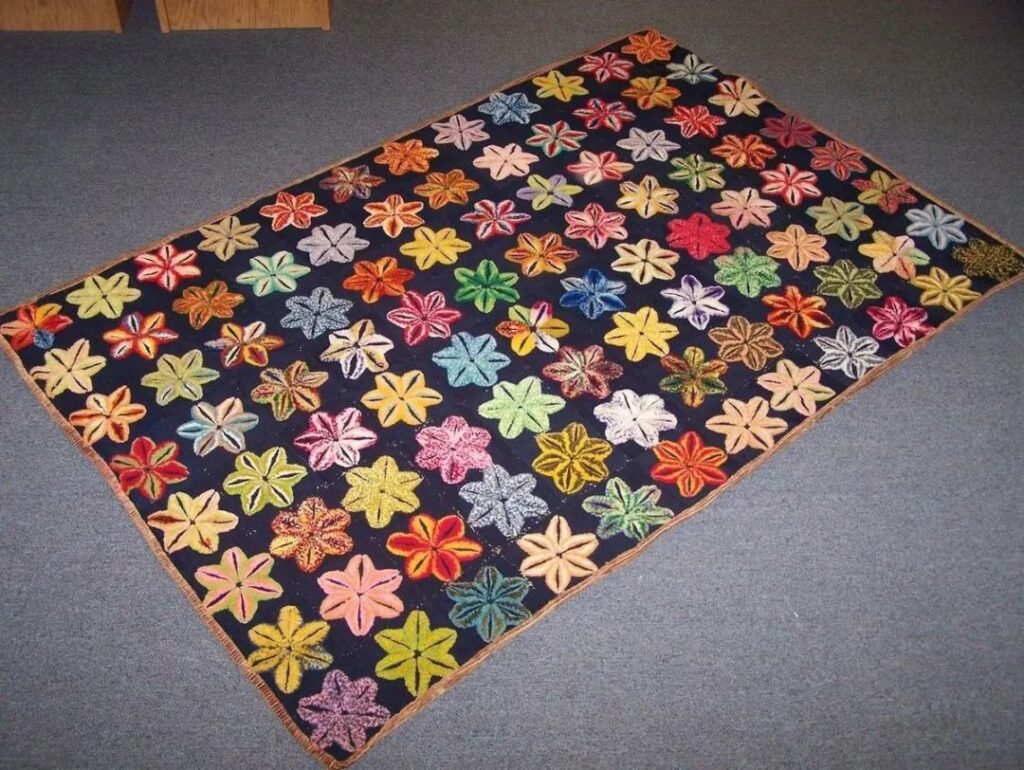
Embroidery has evolved beyond traditional flat techniques, with a method to create three-dimensional effects. If you have an abundance of multicolored embroidery threads or leftover yarn at home, you can cut a paperboard into flower shapes. Surround the paper template with threads and embroider several layers, then carefully cut through the middle and trim into a fluffy, three-dimensional pattern to form a plush flower. This embroidery technique can be applied to various home furnishings, with multicolored, three-dimensional flowers layered and presented in a gradient color scheme, adding a touch of to the embroidery. For those who enjoy embroidery but do not wish to spend too much time, pick up your needle and thread to try this method.
Embroidery DIY with Plush Flowers: Cut out your favorite patterns on paper and place them on the fabric where you wish to embroider. After embroidering and cutting through the layers from the middle, you will have a series of three-dimensional and aesthetically pleasing flower patterns. By piecing these embroidered flowers together, you can create a variety of home items such as quilts, pillows, bags, decorative paintings, and mats.
Let’s learn the basic method: prepare some embroidery threads or yarn, cut a paperboard into the shape of a small flower, and start embroidering from the center with back-and-forth stitches. After completing one stitch, do not directly pass through the diagonal position; instead, make another stitch in the same spot to pull the thread and then pass through the diagonal position for the next stitch. This results in flat stitches on the back and long, filled stitches on the front. Embroider the center and petals, and once the first layer is complete, switch to a different colored thread to embroider the second and third layers until you reach your desired thickness and then cut open.
Begin by cutting the threads in the center of the flower, then cut through the middle of the petals layer by layer. After cutting, remove the paperboard and fluff the flower to create a plush, three-dimensional flower. Watch the video tutorial to learn how to create three-dimensional embroidery plush flowers. In addition to flowers, various patterns can be attempted, such as circles or leaf shapes. Simply draw the shape and embroider around it with several layers, then cut out the shape. This method can be used to embroider pillows, with the center made from yarn wound around a paperboard dozens of times, then trimmed into a yarn ball and sewn onto the pillow. Different colored threads can be used, and petals can be shaped differently, resulting in unique patterns.
Embroidery DIY with Plush Yarn Balls: Besides the method of cutting through the middle after embroidering, you can also embroider directly onto the fabric with a small bundle of threads and then trim to create colorful, three-dimensional plush yarn balls. By combining several, you can create various three-dimensional flower patterns. These can be made into decorative paintings or embroidered onto shoes, hats, and bags, where a few simple yarn balls can be very eye-catching.
Let’s learn the basic method: prepare a piece of fabric for embroidery, cut several cords to fix on the fabric as flower branches, and then take a piece of plush fabric or material (such as a plush fake collar from an old piece of clothing), cut a small piece and fix it onto the fabric with a needle and thread. Once the thread is pulled, it forms an open dandelion-like spherical shape.
After cutting off the excess plush fabric, trim it into a small plush ball to complete the embroidery. Explore the embroidery technique mentioned above, which allows you to create multiple small balls using multicolored plush fabric.
In addition to embroidering small balls with plush material, we can cut a small bundle of thread and secure it onto the fabric with a needle and thread, then trim it into small plush balls.
Watch the video to learn the detailed embroidery tutorial for plush balls. Mastering the methods mentioned will enable you to create a variety of plush balls and combine various materials to produce more sophisticated works.
By learning these clever tricks, you will have several additional patterns to choose from for your future embroidery projects!