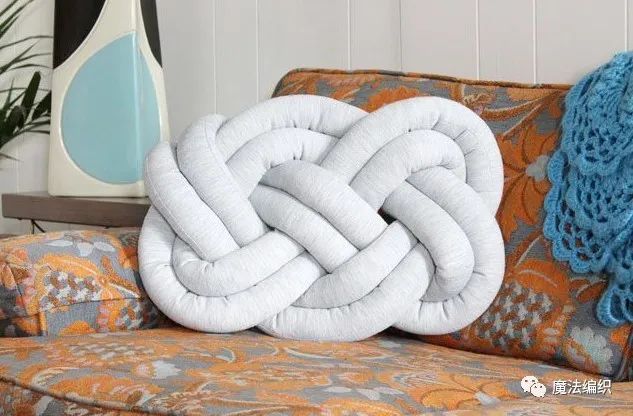
This DIY tutorial for a handmade pillow features a Chinese knot weaving style, making it unique and interesting compared to other pillow-making tutorials you may have learned before. The focus of this pillow’s construction is on shaping, with a well-shaped structure resulting in an excellent pillow. The structure formed after winding and weaving is also quite impressive.
This tutorial is also a guide for creating a Chinese knot cloud knot, helping you better learn the making of handmade pillows and Chinese knot weaving.
Main materials: fabric, cotton. Required tools: scissors, sewing machine, iron.Step 1: Prepare the basic materials and tools, which include fabric, cotton, and paper tubes.
Step 2: Cut the fabric to the appropriate size according to your needs.
Step 3: Since the fabric’s extent is limited, it needs to be pieced together.
Step 4: Sew it together.
Step 5: Use an iron to smooth out the joined parts.
Step 6: Secure and sew the edges into a tubular structure.
Step 7: At this point, work on the end opening structure.
Step 8: Stuff it into a box.
Step 9: Create the pleated structure as shown in the picture.
Step 10: You can place another over a single fabric bucket.
Step 11: Use a toilet paper tube to help stuff the cotton.
Step 12: Operate as shown in the picture.
Step 13: After filling, sew the edges.
Step 14: Here, a shoelace is used to demonstrate how to weave and wind the pillow.
Step 15: Place as shown in the picture.
Step 16: Start winding from the other end.
Step 17: Achieve the effect of the first winding knot.
Step 18: Continue winding.
Step 19: Observe the formed cloud-like woven structure.
Step 20: Continue with the structural winding.
Step 21: Form the structure as shown in the picture.
Step 22: After the final knot is woven, the structure takes shape.
Step 23: The woven effect is achieved after completion.
Step 24: Secure it in place.
Step 25: Since there are two openings at the ends, if they are not closed after winding, they need to be connected together.
Step 26: Sew them together.
Step 27: The cloud knot effect pillow is now complete.