The easiest DIY old furniture transformation in history is here! Even those with clumsy hands can quickly master it. If you still can’t learn it, come to me. Miss Miao Loves Life
There are replies like – “Envious but not jealous” – “My eyes have learned, but my hands are useless” – “Do I lack tools? What I lack is these hands”. Indeed, not to mention you all, even the second girl who writes articles every day belongs to the type of “learned after seeing, forgotten after writing”. Every day, she praises others for being extremely powerful. But when it comes to her own desire to transform something, she is left helpless and just stares blankly.
Since major transformations are not feasible for us, the second girl will write a post about small item old object transformations collected from websites like Xiaohongshu and Zhihu: dinner plates, bowls and chopsticks, empty bottles, chairs, tables, screens… everything is included. It is guaranteed to be easy to start, convenient to transform, turn waste into treasure, and bring about a huge improvement! Dreamy style, vintage style, everything is okay under her hands.
@Zeshan (Xiaohongshu ID: 810851513) is a super beautiful girl in painting, handicrafts, and photography. I first saw her works on Douyin, and the girlish heart hidden deep in my heart was instantly activated and ignited: What treasure furniture these are! And these are all transformed by Zeshan from old, dirty, and broken furniture.
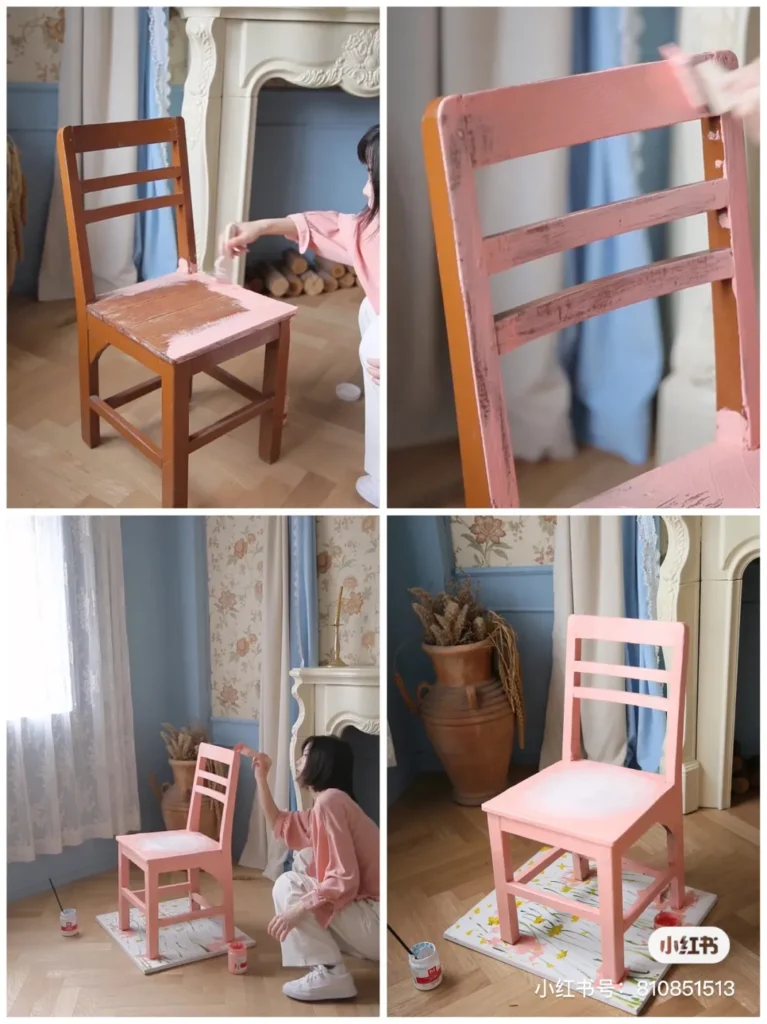
For example, this pink chair like in Alice in Wonderland: At first, it was just such an unremarkable chair that everyone has in their rural hometown, a liver-colored copper-red chair. First, use a sanding brush to sand back and forth on the chair to remove some rough and uneven small details, then use a rag to scrub the chair clean. Then apply a flesh-pink base color with paint. PS: Here Zeshan said that this chair is only for taking pictures and she doesn’t care about the quality, so she used ordinary acrylic paint, which is waterproof but not durable.
The specific choice of paint should be based on everyone’s actual situation and usage. Buy some wooden sticks and paint them powder blue (Keywords for wooden sticks: European-style carved small columns, wine cabinet fence). After installing and fixing them, add some decorative patterns. Finally, draw the final pattern on the chair. Isn’t it very simple!Don’t like such a girly style? There is also a vintage style! This “Flowers Blooming in Prosperity” ornament, whether paired with a red space or green furniture, who would have thought that it was originally just an old wooden window discarded near the trash can? First, conduct a simple cleaning. Since it is difficult to paint on the mirror surface, Zeshan came up with a clever idea. First, draw a draft on white paper, stick the draft on the back of the glass, and then trace and color. After painting the main pattern, conduct fine processing of coloring around it. The European-style court relief bought on Taobao is pasted and decorated after being colored. Well, a wonderful ornament is completed.
In her sharing, there are also many, many treasure furniture. For example, the empty bottle transformed into a vase ornament that fully embodies turning waste into treasure; for example, the girl’s dressing mirror transformed from an old tea tray + pearls + lace. Each one makes the second girl marvel. Due to space limitations, I can’t list them all. Everyone can go to Xiaohongshu/Bilibili to search for @Zeshan to watch the specific production videos!
The shabby cabinets that every family has can also be turned into treasures. There must be quite a few old cabinets and old tables like these that you have seen at your grandparents’ or great-grandparents’ places.
These tables, filled with a sense of wear and age, and occasionally marred by dents and scratches, are usually disdained by the second young lady. But in the hands of the skilled, they are transformed into brand new, vibrant pieces of furniture. @XingShiGuangBuQi (Little Red Book ID: 945718756) has a large rooftop garden at home with two people and five cats, living a life that the second young lady envies.
If some people are concerned about the origin and hygiene of repurposed furniture for indoor use, placing them in a small garden is an ideal choice. This old cabinet, costing only 20 yuan, was sourced online by ShiGuang. With all four corners intact and no major damage, it was particularly heavy, indicating that it was originally an expensive solid wood cabinet. The transformation process is relatively uniform, starting with cleaning and sanding, primarily using an angle grinder and sandpaper discs. Since it’s placed outdoors, a layer of high-hardness outdoor matte transparent paint is added. Then, according to personal preferences and design, custom butterfly bone paper is adhered and glued on. Behold the effect in the garden—it’s a perfect match! She also bought discarded wooden chairs for 10 yuan each: painted with off-white water-based paint, sanded with 80-grit sandpaper to create an aged look, and thus a garden scene is set. @ErLiHuaShe (Little Red Book ID: TAMSUU) is a private painting school and an art space with multiple different style shooting scenes. As everyone knows, the most important aspect of an art space is the sense of art, and artful home furnishings equate to spending money. Thus, he picked up an unwanted old-style mahogany cabinet with a traditional cadre style and decided to transform it himself. Using Dongyang wood carving corner flowers, white glue, matte off-white water-based wood paint, and vintage ceramic and copper drawer handles, these are all the materials used, with a total cost of less than 100 yuan. After pasting the corner flowers on the four corners, the first layer of paint is applied. The first layer doesn’t cover much, so after waiting for 2 hours, the second layer is applied, and by the third layer, the work is essentially complete. Finally, the drawer handles are installed: jiangjiang~ the work is done! A lace crocheted table runner is laid, and a plant is placed, completing the small French-style cabinet. If for personal home use, it is recommended to purchase an additional repair paste before painting to fill in any dents and depressions on the cabinet body, making it look smoother. Let’s look at another case of repurposing an old cabinet. @HuaYuHua (Little Red Book ID: 181915333) has an old bowl cabinet from her grandmother’s home, and HuaYuHua plans to paint it blue-gray. Because this color, unlike white, has strong coverage, it only requires a simple sanding with sandpaper on the cabinet body first.Apply several coats of paint in sequence. (The blogger purchased Sanqing brand wood paint. There will be detailed introductions about the specific painting methods and the number of coats in the store.)
This is the effect after coloring. Some people choose to paint the inside of the cabinet as well for a more beautiful look. However, the blogger mainly considered that the things placed inside are rather messy, and it would be cleaner to cover them up. So, the blogger bought oil painting frames online. Doesn’t it look more harmonious as a whole? Finally, she displayed her painting skills and painted decorative patterns with acrylics in the four frames. In short, let the second girl summarize: 1. Sanding + painting = the ultimate solution! (There’s no old furniture that a new color can’t rescue.) 2. If you want it to be more beautiful, you can buy some decorative accessories on Taobao. 3. If you have painting skills, don’t be afraid to paint on your furniture! Small item makeovers, you can’t say you can’t learn! If you think cabinets, chairs, and mirrors are still too big and there’s no space to paint and sand on a large scale, then you can always learn from these small items. @Not Tired of Fiddling (Xiaohongshu ID: sa760445257) This blogger wrote in her self-introduction, “A Libra who loves handicrafts, traveling, food, tinkering, and making friends.” After seeing her first work, I deeply understood this sentence: She is really a person who loves to tinker, do handicrafts, has a big imagination, and lots of ideas! Everyone has cola, beer and other beverage cans after drinking, right? Most people just throw them away directly, while some save them to sell. But the blogger came up with an idea to turn them into imitation gypsum ornaments. The method is very simple: Tear the cotton paper that is used to pad under a whole box of fruits at home or left over from other places into pieces. Then knead the beverage can into any shape at will. Add water and white glue, and mix the cotton paper into a mud-like state. Finally, stick the can with the cotton paper mud and expose it to the sun to dry. The imitation gypsum ornament is ready. Isn’t it so easy? Using the same method, you can also make paper clay dry vases. First, use thin iron wire to wind out the approximate shape you want. It doesn’t matter if it’s irregular. Tear up express delivery boxes or egg trays and soak them in water to make paper pulp. Add glue, use wet tissues to dip in glue to reinforce the steel wire and thicken the shape. Then paste on the paper pulp mud (to avoid the steel wire not sticking firmly when directly pasted with mud). Let it dry, and it’s done! Stick dried flowers on it, it’s really creative and full of design sense. There are also many handicrafts related to knitting on her Xiaohongshu. The second girl won’t list them all here because she doesn’t have such skillful hands QAQ. Friends who are interested can search by themselves. The second girl knows that there are many moms among our followers. So, finally, I’d like to share a simple handicraft that is very suitable to be done with kids at home. @Nuancha’s Handicraft Circle (Xiaohongshu ID: 666826041) Nuancha is a handicraft enthusiast and a practitioner of upcycling who pays attention to environmental protection. Many of the handicrafts she shares are made from items easily available in nature.Take for example the following hanging decoration, which utilizes fallen branches, fallen leaves, pine nuts, and more. It’s simple: tie them together with jute rope, and you can also purchase some Christmas tree ornaments on Taobao to easily achieve a natural forest style. Additionally, this ethnic-style hanging decoration is actually made from leftover ice cream sticks. Clean the ice cream sticks, and then paint and doodle them freely.
Regardless of style or color, this is when children can unleash their creativity. Prepare four branches, with the length determined by the longest ice cream stick and the width slightly narrower than the thinnest one. Then secure them with thin jute rope. Attach the painted ice cream sticks to the branches using a glue gun; it’s better if they’re not too neat—messy looks better. If you have shells or other decorations at home, feel free to add them as well. Clay should be a staple in households with children. We’ve led children in a ‘reviving the withered wood’ transformation project using easily obtainable sand and clay from nature as the ‘vase base’; it’s fine if you pick up a withered branch with some dead leaves. Then, let them freely mold their imaginations with clay or modeling paste: flowers, animals, airplanes, tanks, food… anything is possible. All impossibilities appear on this withered branch, which is the essence of ‘reviving the withered wood’. Well, let’s discuss in the comments whether you’ve learned these DIY upcycling ideas from the second lady’s treasure box. If you want to see more similar small item transformations or simpler DIY articles, don’t forget to like and watch!